My external hard drive suddenly stopped mounting on my Mac, and Disk Utility can see it but won’t open it. It has important photos, work files, and backups I really need, so I’m trying to figure out whether Mac external hard drive data recovery is still possible and what steps are safest before I make things worse.
I’ve hit this enough times on macOS that I don’t treat an unmounted drive like a dead drive right away. Some of the ugliest cases I saw turned out to be file system damage, nothing worse. The disk showed up in Disk Utility, the LED kept blinking like normal, and the Mac still saw the hardware. It simply would not mount.
Before I touch repairs, I usually clear the easy stuff first.
Swap the cable. Plug the drive straight into the Mac, skip the hub, and try another USB or Thunderbolt port.
Check Finder settings too. I’ve seen external disks hidden there, which wastes time. If the drive appears in Disk Utility and the listed size looks close to correct, I take that as a decent sign. Your Mac is still talking to the device.
Then comes the part people rush past. If the files matter, stop trying to “fix” the drive first. Get the data off it.
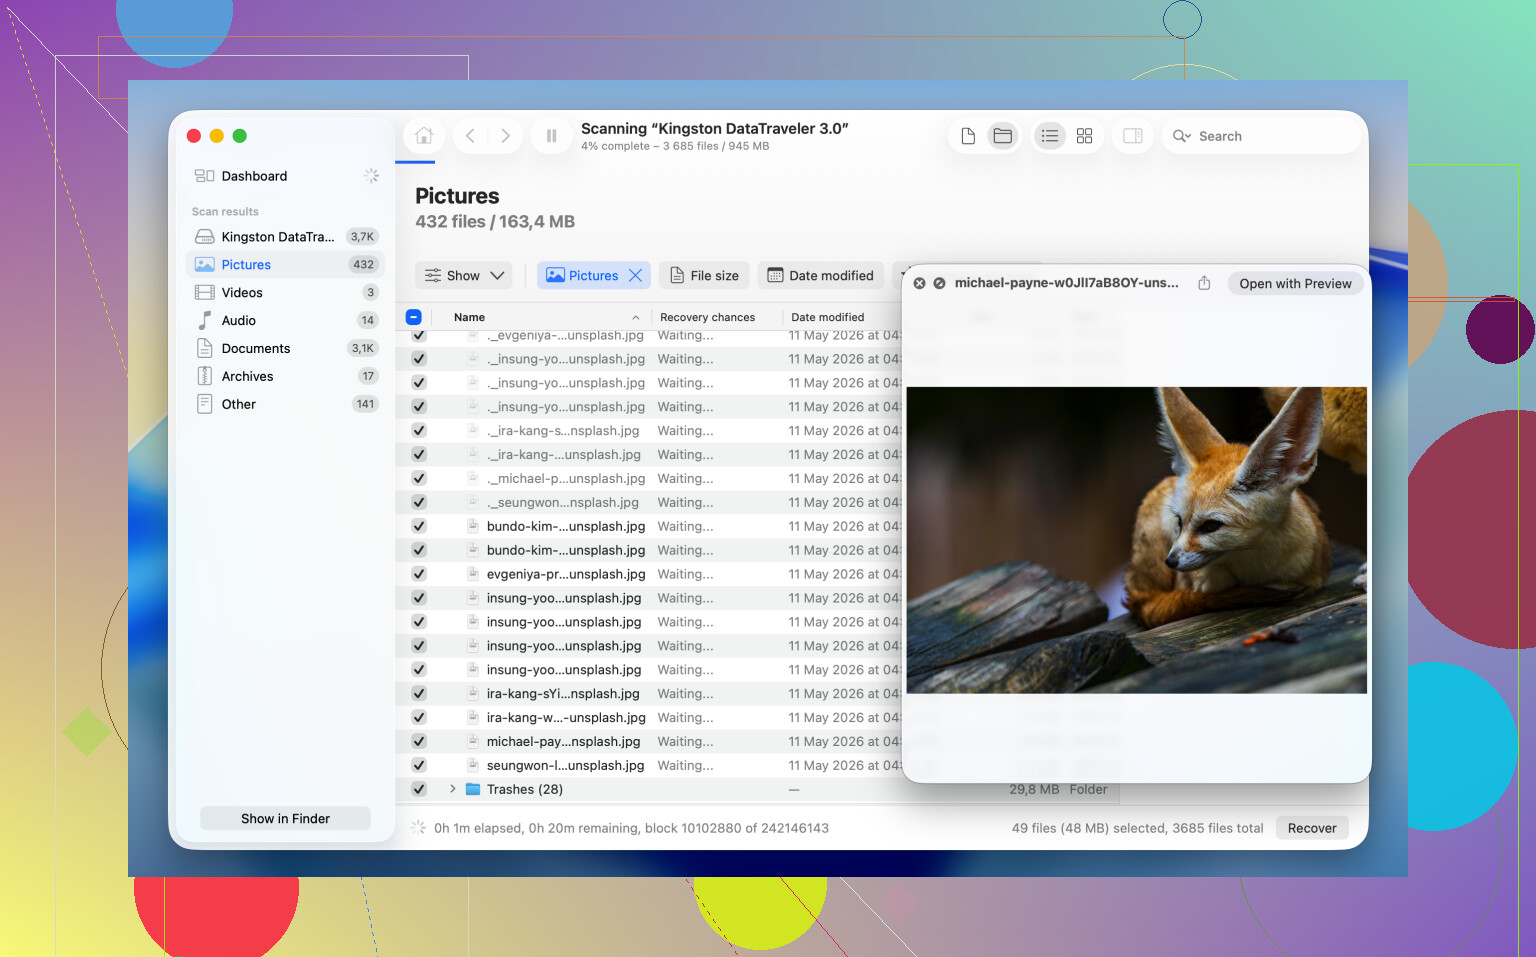
From what I’ve seen, Disk Drill tends to be the practical pick for drives macOS refuses to mount. It reads the storage device directly, so you still have a shot at your files even when Finder and Disk Utility refuse to cooperate.
If the data matters, this is the order I’d use:
1. Install and open Disk Drill.
2. Find the unmounted drive in the device list.
3. Make a byte-to-byte backup first if the drive feels unstable, drops connection, or acts weird.
4. Scan the original drive or scan the backup image.
5. Look through what the scan finds.
6. Preview the files you care about, make sure they open.
7. Restore them to a different drive, not the same one.
After your files are somewhere safe, then you can mess with the original disk without sweating every click.
If you only want the drive usable again, formatting is often the shortest path.
Reformat the Drive
A format rebuilds the file system. It does not bring your old files back, but I’ve seen it clear mounting issues fast.
1. Open Disk Utility.
2. Click View > Show All Devices.
3. Pick the physical disk, not the volume indented under it.
4. Click Erase.
5. Type a name.
6. Pick APFS if this drive stays in the Mac world.
7. Pick exFAT if you need it to move between macOS and Windows.
8. Click Erase and wait.
9. Unplug the drive, then plug it back in.
If it mounts fine after this, I’d put money on file system trouble, not failed hardware.
If you’re trying to avoid a format, there are a few things worth trying first. I wouldn’t expect miracles if the file system is badly wrecked, but sometimes one of these gets you over the line.
Method 1: Run First Aid on the Physical Disk
I’ve had cases where the problem was higher up in the partition structure, not inside the volume itself.
1. Open Disk Utility.
2. Click View > Show All Devices.
3. Select the physical drive at the top.
4. Click First Aid.
5. Confirm the repair.
6. Let it finish.
7. Try mounting the drive again.
If First Aid only finds small errors, this sometimes gets the disk back without extra drama.
Method 2: Kill a Hung fsck Process
I ran into a few drives where macOS got stuck during a background file system check. The drive sat there unmounted, doing nothing useful.
1. Open Terminal.
2. Run: sudo pkill -f fsck
3. Press Return.
4. Enter your admin password if macOS asks for it.
5. Wait a few seconds.
6. See if the drive mounts on its own.
This does not repair anything by itself. It stops a stuck background check which might be blocking the mount process.
Method 3: Mount It Manually in Terminal
Sometimes Disk Utility fails at the front end, while the volume is still mountable from Terminal. I’ve had this work when the GUI did nothing.
1. Open Terminal.
2. Run diskutil list
3. Find the identifier for your drive, something like disk4s1.
4. Run diskutil mount /dev/disk4s1
5. Replace disk4s1 with your own identifier.
6. Press Return.
7. Read the error message if it fails.
If the command works, macOS mounts the volume right away. If it doesn’t, Terminal usually gives you a more useful clue than Disk Utility does.
Last thing, all of this assumes the drive itself is still healthy. If it does not appear in Disk Utility at all, shows the wrong capacity, clicks, keeps disconnecting, or won’t spin up or power on, I’d stop treating it like a mount issue. At that point it looks more like hardware failure. Software fixes usually won’t do much there, and extra attempts sometimes make recovery harder. Yeah, learned taht one the bad way.
1 Like
Yes, if Disk Utility still sees the drive, data recovery is still on the table. Mount failure does not equal total loss. I agree with @mikeappsreviewer on one big point, stop poking at repairs if the files matter.
I’d add two things they did not cover.
First, check the drive’s SMART status or health info, if the enclosure reports it. Apps like DriveDx help, and sometimes smartctl in Terminal works. If you see lots of reallocated or pending sectors, stop using the disk for anything except imaging or recovery. Bad sectors tend to get worse fast.
Second, test the bare drive on another system, if this is an external HDD inside a USB enclosure. I’ve seen the USB bridge board fail while the disk itself was fine. Pulling the drive from the enclosure and attaching it with a SATA to USB adapter saved one of my old photo drives. Bit annoying, but it worked.
I sort of disagree with rushing to First Aid on a flaky disk. On a healthy disk with minor file system damage, fine. On a drive making weird noises or dropping offline, every repair attempt adds stress. In those cases, Disk Drill is the safer first move because you can scan the device or image and recover to a differrent disk.
Also, skip random Terminal write commands from old blog posts. If FileVault or APFS metadata is damaged, those “fixes” often make a mess.
If recovery finishes, then erase and retest. If the drive fails again after format, replace it. For extra reading, more fixes for an external drive not mounting on Mac.
If Disk Utility sees the physical drive with the correct-ish size, I would not call it dead yet. Unmounted on Mac usually means one of three things: enclosure/power issue, damaged partition map, or file system corruption. Actual hardware death is a diff problem.
I mostly agree with @mikeappsreviewer and @vrijheidsvogel, but I would push one thing harder: check the system logs before doing repairs. Open Console and filter for diskarbitrationd, kernel, or I/O error, or use Terminal:
log show --last 10m | grep -Ei 'disk|I/O|fsck|apfs|hfs'
If you see repeated I/O errors, media errors, or disconnect/reconnect spam, stop trying mount/repair cycles. That usually points to hardware or enclosure instability, and each retry can make recovery worse.
Another useful check is diskutil info /dev/diskX on the physical disk. Look for:
- File System Personality
- Read-Only Media
- SMART status if available
- Protocol and ejectability
If the partition map itself is broken, TestDisk can sometimes rebuild it, but honestly I would only mess with that after extracting data. For actual file recovery on a Mac external hard drive that won’t mount, Disk Drill is still the practical move because it can scan the device even when macOS refuses to mount the volume. If the disk is unstable, image first, scan second. That order matters a lot.
One place I sorta disagree with the usual advice: trying another Mac is often more useful than people think. Different macOS versions sometimes mount borderline APFS/HFS volumes differently. I’ve had one Mac refuse a drive and another read it long enough to copy everything off. Stupid, but real.
Also, if this drive contains “backups,” check whether that means Time Machine. If so, don’t expect a normal folder structure from recovery. You may need to recover the sparsebundle or APFS backup data as chunks, which is annoyng but not impossible.
If you want a walkthrough, this Mac external hard drive recovery video guide covers the methods in a way that’s easier to follow than random text posts.
One angle missing from @vrijheidsvogel, @cacadordeestrelas, and @mikeappsreviewer: check whether the drive is mounting invisibly because macOS marked it read-only or suppressed it after repeated errors. In Terminal, diskutil apfs list or diskutil list can show a volume that exists but is not getting a normal Finder mount path. If that happens, the issue is sometimes with mount policy, not total unreadability.
I also would not overvalue SMART on many USB externals. Useful when available, sure, but plenty of enclosures report nothing or misleading data. So a “failing” SMART readout helps, but a clean one does not prove much.
My order would be:
- Try another enclosure or direct SATA connection if possible.
- Check if the volume appears as read-only, uninitialized, or with a broken container.
- If the disk stays stable, clone it sector by sector first.
- Recover from the clone, not the original.
For recovery, Disk Drill makes sense because it can work with unmounted drives and images.
Pros:
- good preview support
- scans physical disks and disk images
- Mac-friendly interface
- useful for photo and document recovery
Cons:
- deep scans can take ages
- results need sorting, especially for raw recovery
- paid recovery tier if you need to actually restore lots of data
If the drive contains Time Machine data, I’d be extra careful. Recovery is often messy even when the files are technically there. If the enclosure is the culprit, swapping that can save you a lot of pain.