I need help deleting all photos from my iPhone without making it hot or painfully slow. Every time I try to remove a large batch from the Photos app, the phone starts overheating, lagging, and draining battery fast. I’m looking for the safest and quickest way to delete all iPhone photos without performance issues.
Some photo libraries get so bloated your phone starts acting drunk. I had one go from fine to unusable in about a week. Photos app froze. Storage meter sat there like it was painted on. Deleting random stuff did almost nothing.
What works depends on where your photos live and how packed your phone is.
Before you touch anything, watch for iCloud Photos
This is where people get burned.
If iCloud Photos is on, your photo library is synced across your Apple devices. I delete a picture on my iPhone, it vanishes from my iPad and Mac too. Normal behavior. Not a glitch.
If you want to keep the library but free up phone storage, go to Settings > Photos and turn on Optimize iPhone Storage.
What happens then:
Full resolution originals stay in iCloud.
Your phone keeps smaller versions.
The storage number usually drops without you deleting your memories.
If your photos already exist somewhere else and you want them off the phone, then move on.
Working from a computer felt less painful
On a Mac, I would not use the Photos app for this job. It tends to drag iCloud into the mess. Image Capture is the cleaner route.
Here’s the path:
Open Applications
Launch Image Capture
Plug in the iPhone
Wait
And yeah, the wait part is longer than people expect. On a huge library I saw it sit there for 30 minutes looking dead. Then thumbnails showed up all at once. After that, Command + A and delete.
On Windows, you’re stuck with File Explorer and the DCIM folder. It works, sort of. I had more disconnects there, especially during large deletes. If PC is your only route, keep it small. Under 500 files per batch gave me fewer errors. More than that, and the phone started dropping the connection or hanging.
Trying to do it on the phone
The stock Photos app gets sloppy once the library gets huge. Somewhere around 10,000 to 15,000 items, mine started lagging hard. Selection missed files. Scrolling turned jerky. When free storage was already near zero, the app would freeze while deleting because iOS needed room to process the change.
Two things helped me before cleanup:
Delete one or two large apps first
I removed a game and one streaming app. That freed enough working space for iOS to stop choking during photo deletion.
Do smaller batches
Don’t try to wipe the whole thing in one pass. A couple thousand at a time went through. Trying everything at once failed more than once for me.
If you need to select a lot of photos fast, this trick still works:
Tap Select.
Drag across the bottom row.
Keep one finger down.
With your other hand, tap near the top of the screen.
The view jumps upward and the selection extends with it. It’s a little janky on giant libraries, but still faster than dragging through ten thousand thumbnails like a maniac.
Where the Photos app falls short
This is the part I got annoyed with.
You don’t see file sizes.
You don’t get a clean way to sort by size.
You can’t quickly tell which videos are eating 4GB and which photos are tiny.
Favorites aren’t protected during big delete sessions.
Near-duplicate shots are not grouped in a useful way.
For light use, fine. For cleanup on a stuffed phone, not good enough.
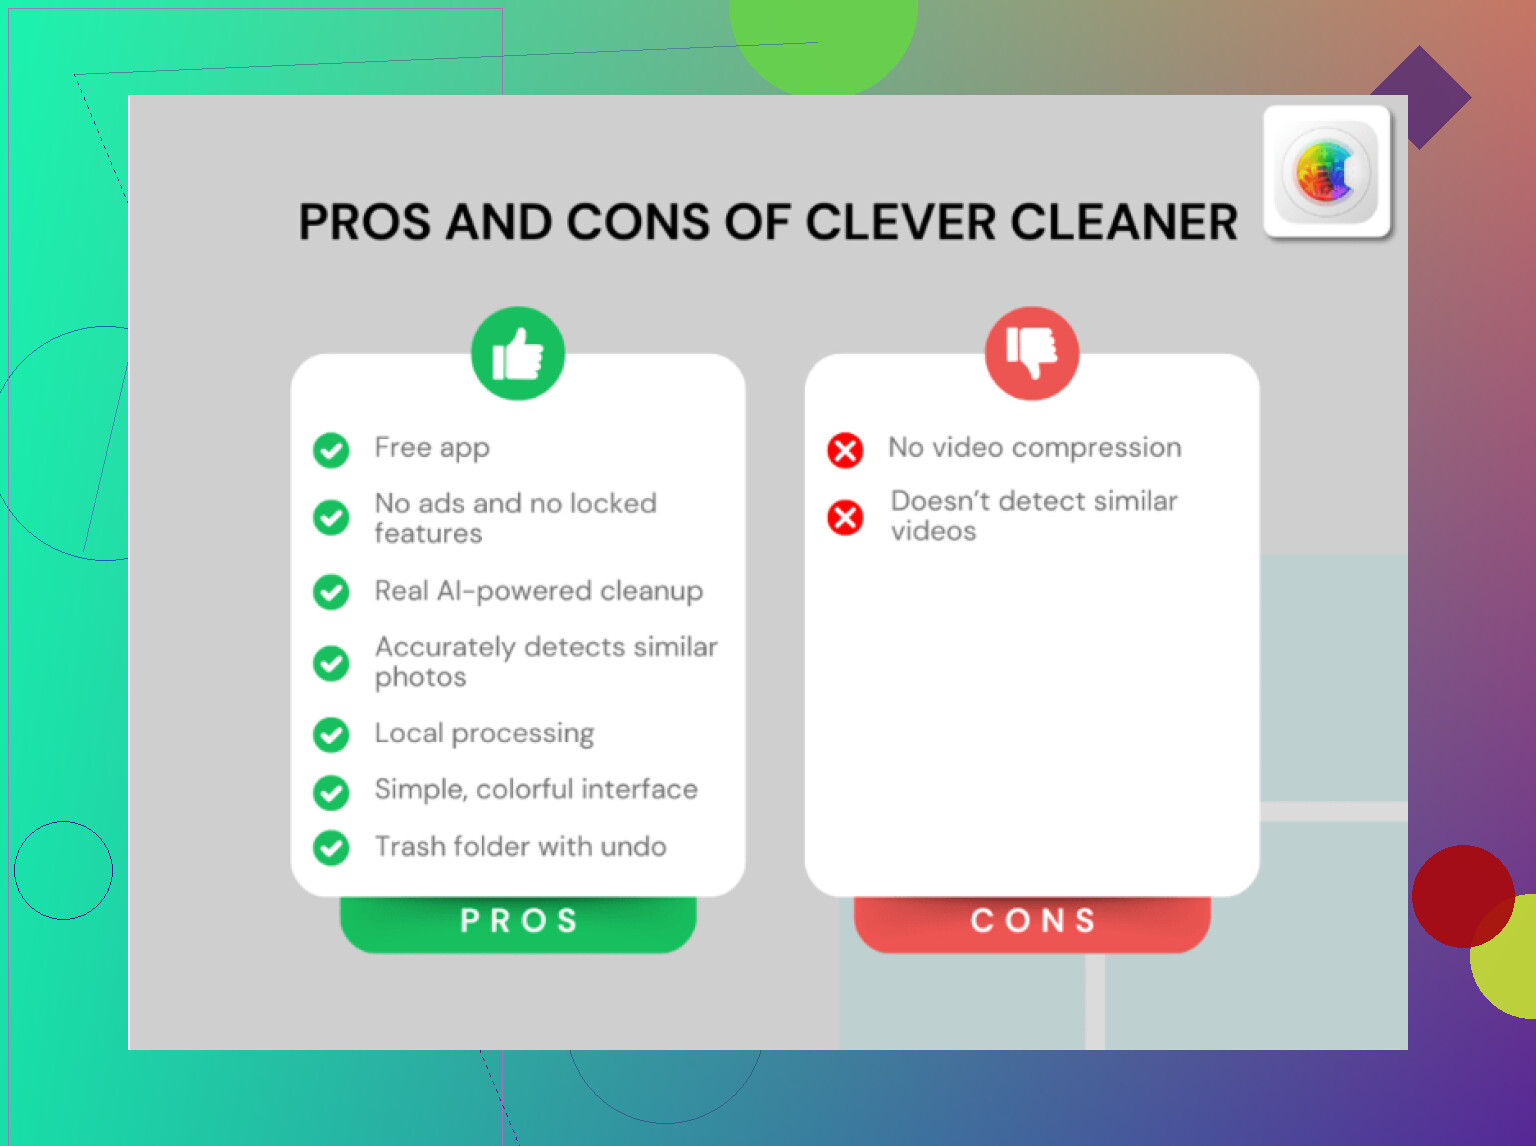
Clever Cleaner covers the missing stuff
I tried it because the native app was wasting my time.
The useful bits:
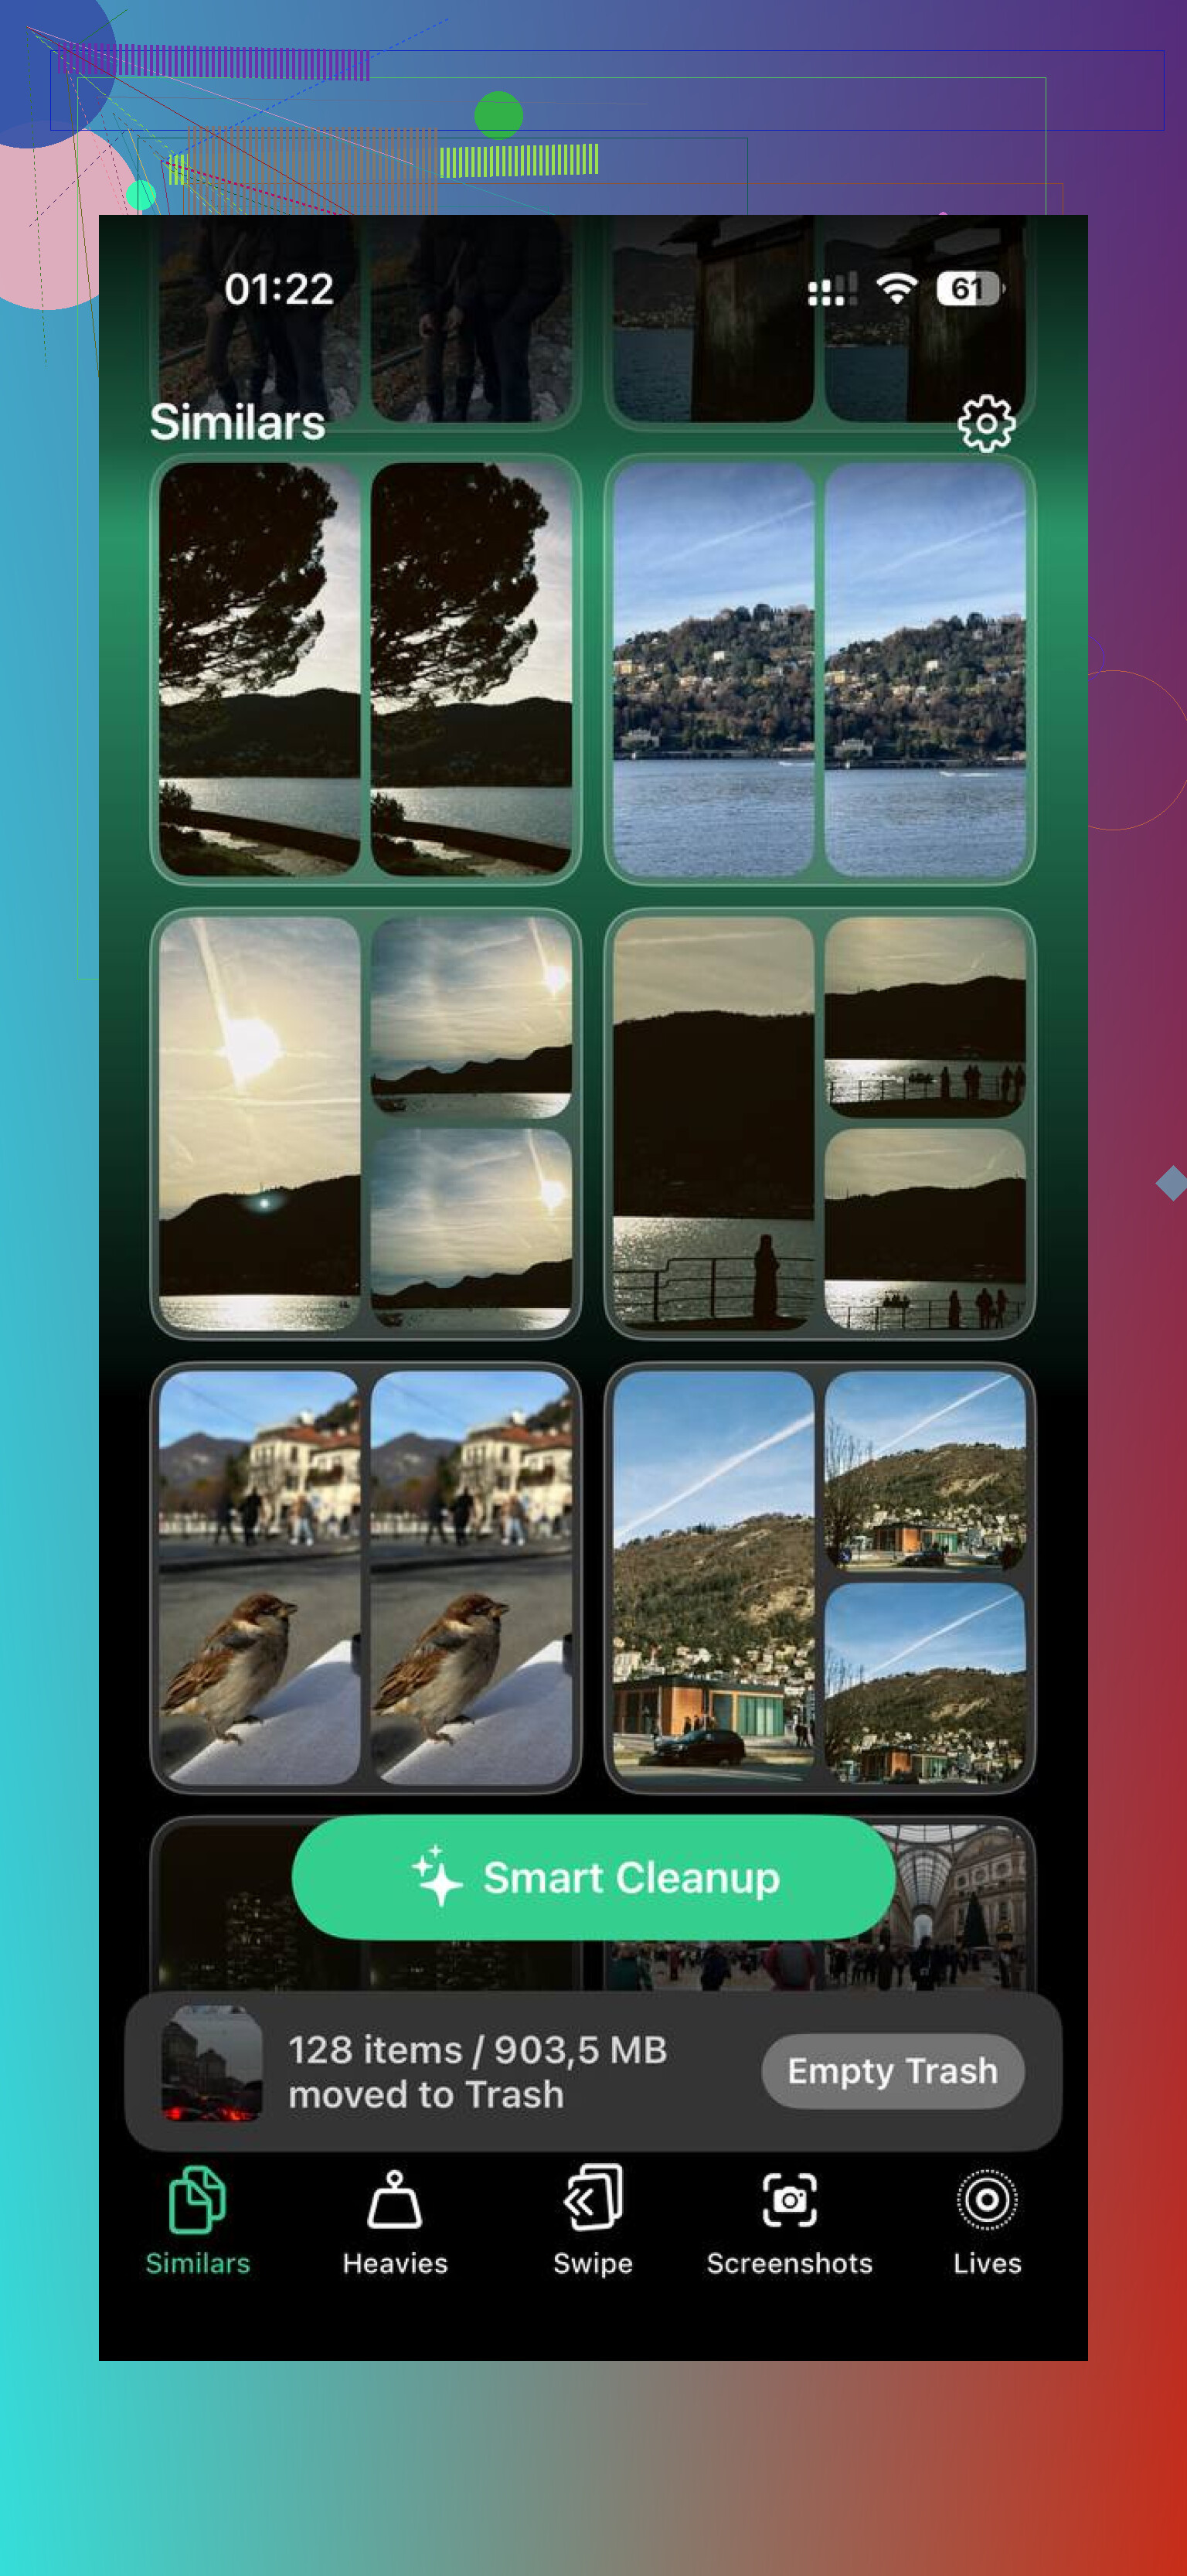
Heavies
This section sorts your library from biggest file to smallest. That alone saved me time. The worst storage hogs floated right to the top, old 4K clips, giant exports, long screen recordings I forgot existed. Deleting ten huge files freed more space than nuking hundreds of regular photos.
Similars
This one groups near-matching shots, not only exact duplicates. Burst photos, three tries of the same dog pic, five blurry versions of the same receipt, all lumped together. I kept one and tossed the rest.
Screenshots
Every screenshot shows its file size on the thumbnail. Small thing, but useful. I didn’t have to guess before deleting.
It also processes on the phone itself. My stuff didn’t get shipped off somewhere else for scanning. If your library has finance screenshots, messages, IDs, or other private junk, that matters.
I also found it easier to keep favorites and clear the rest there than in Apple’s app.
The step people forget
Deleting photos is only half the job.
iOS moves them into Recently Deleted, and those files still take up storage until you empty it. Sometimes for up to 30 days if you leave it alone.
So after cleanup:
Open Photos
Go to Albums
Find Recently Deleted in Utilities
Tap Select
Tap Delete All
That’s the part where the storage meter usually changes for real.
If the number still looks wrong after emptying Recently Deleted, restart the iPhone. I’ve had the storage count stay stale until a reboot. Then it updated. Bit dumb, but there it is.
4 Likes
Stop deleting while the phone is charging. That alone cuts a lot of heat.
A few things I’d do, different from what @mikeappsreviewer suggested:
-
Turn off Low Power Mode if it’s on.
It sounds backward, but heavy delete jobs under throttled performance drag on longer. Longer job, more heat. -
Put the iPhone in Airplane Mode first.
Photos deletion kicks off indexing, sync checks, background stuff. Airplane Mode cuts a chunk of that. Less radios, less heat. -
Remove the case.
Simple, but it matters. Heat gets trapped fast. -
Do the delete after a fresh reboot.
A reboot clears stuck Photos processes and cached junk. First 5 to 10 minutes after restart, do your batch delete. -
Use search-based chunks instead of giant date ranges.
Delete by media type first.
Videos.
Screen recordings.
Screenshots.
Selfies.
Videos hit storage hardest. Deleting 200 big videos often frees more than 5,000 photos, and it puts less strain on the UI. -
Let the phone rest between batches.
I’d do 300 to 800 items, then lock the screen for 2 to 3 minutes. Sounds dumb, works better than forcing one huge pass. -
Keep the screen dim.
Brightness adds heat. Set it low before you start.
I slightly disagree with the “always use a computer” route. On some Windows setups, DCIM deletes get flaky and slow. If your port or cable is bad, it gets worse fast. For some people, cleaning by type on the phone is less of a mess.
If you want a faster way to target the worst space hogs first, Clever Cleaner helps because it surfaces large files and similar shots without the Photos app choking as much. This is the App Store link for free iPhone photo cleanup with Clever Cleaner.
One more thing people miss. After each batch, leave Photos open to a normal album for a minute. If you start jumping around too fast, indexing gets laggy and the phone heats up agian. Restart once you finish a few rounds if storage still looks stuck.
I’d add one thing neither @mikeappsreviewer nor @cazadordeestrellas really leaned on enough: stop Photos from doing extra analysis while you’re cleaning.
Go to Settings > Siri & Search > Photos and turn off stuff like Show App in Search and content suggestions for a bit. Also disable Background App Refresh for Photos if it’s available on your setup. It cuts some of the behind-the-scenes churn that makes the phone feel like a toaster.
Also, if you have Live Photos everywhere, convert or remove those first. They’re sneaky because one “photo” is really a photo plus a mini video. Same with shared albums. Clear those too if your goal is truly everything.
My order would be:
- Unplug charger
- Turn off Bluetooth and Wi-Fi, not just Airplane Mode
- Force close every app except Photos
- Delete biggest Live Photos and videos first
- Wait 1 to 2 mins
- Then do regular photos in smaller runs
I kinda disagree with doing giant swipe-selections at all. On older iPhones that method gets laggy fast and mis-selects stuff. Albums by media type are less annoying.
If the native app keeps choking, Clever Cleaner is honestly easier for finding the junk that matters first, especially large videos and similar shots. Then do a final wipe in Photos and empty Recently Deleted.
Also this step-by-step guide to delete iPhone photos faster without overheating is probly worth a look.
Big thing I’d add to what @cazadordeestrellas, @reveurdenuit, and @mikeappsreviewer already covered: check your thermal conditions, not just your delete method.
If the room is warm, or the phone was in sunlight, or you were using it right after recording video, the delete job will cook it faster. I’d literally move to a cooler room, put the phone on a hard table, and leave it untouched while each batch processes. Soft surfaces trap heat more than people think.
Also, if you want everything gone, the fastest and least stressful route is often not deleting inside Photos at all. Back up what matters, then do Settings > General > Transfer or Reset iPhone > Erase All Content and Settings. That wipes the library without making Photos grind through tens of thousands of individual removals. I actually disagree a bit with the idea that batch deleting is always the best path if your goal is truly zero photos.
If you still want selective cleanup first, Clever Cleaner is useful for surfacing the biggest offenders before you do the final nuke.
Pros for Clever Cleaner:
- Easier to spot huge files
- Good for similar shots
- Less manual hunting
Cons:
- Still another app in the workflow
- Not necessary if you’re doing a full device erase
- Cleanup suggestions are only as useful as your library organization
For “delete all,” full erase wins. For “delete smart,” Clever Cleaner helps.