I just accidentally deleted a folder with important work and personal files on my Windows PC and I’m trying to get them back as quickly and safely as possible. I’ve narrowed it down to Recuva and Disk Drill but I’m not sure which one is more reliable, easier for a beginner, and less likely to mess up my chances of recovery. For a first recovery attempt, which tool should I install and run first, and are there any settings or precautions I should know about before I start scanning?
Alright, here is what I wish someone had posted before I wasted hours bouncing between random “top 10 recovery tools” blog spam.
I shoot photos and video on the side. Paid stuff, but not my main job. So my week looks like this: SD cards piling up on my desk, one external drive for “urgent”, one for “archive”, a laptop that travels, a desktop that never moves. Things go wrong. Cards get yanked while writing, Lightroom crashes in the middle of import, Windows decides “this drive needs to be repaired” and nukes the file system.
Over the years I tried a bunch of data recovery apps. Some did nothing. One overwrote part of the same drive it was scanning, which is about as bad as it sounds. Then a friend who does IT work sent me this link and told me to stop experimenting and use Disk Drill:
https://www.reddit.com/r/DataRecoveryHelp/comments/1qi1apk/disk_drill_review/
I read through it, grabbed the program, and ended up sticking with it. This is what actually mattered to me in day to day use.
How much setup it needs before it does anything useful
The thing I noticed first was how little it asks from you when you are already stressed out.
A lot of tools make you pick some “quick scan vs deep scan vs magic scan” option, plus a bunch of technical toggles. If you guess wrong, you wait an hour and get trash or half your files.
With Disk Drill I pick the drive or card, hit scan, and leave it alone. It runs all its scan types on its own. You do not have to think about partition tables, file signatures, whatever. It starts throwing results on screen while it works.
I have handed it to people who struggle to attach files in Gmail, told them “click the broken drive, press the big button”, and they got through it.
Scan speed, roughly, from someone who actually timed it
Numbers from my own stuff:
• 32 GB SD card from a Sony: 2–4 minutes.
• 64 GB card with a mix of photos and 4K clips: 5–8 minutes.
• 500 GB USB SSD: around 15–20 minutes on USB 3.
• 1 TB internal SSD: longer, but I could browse found files and start recovery while it still scanned the rest.
Key detail: it shows files as it finds them. You do not sit there staring at a progress bar stuck at 62 percent. If you see the folder you needed and the previews look fine, you recover and move on. When there is a client waiting, this matters more than any clever UI.
How picky it is about file formats
This is where I got sold.
Every recovery tool loves to say “supports hundreds of formats”. Useful statement would be “does it treat RAW properly” and “does it rebuild video in a usable way”.
On the photo side, I have recovered:
• Canon: CR2, CR3
• Nikon: NEF
• Sony: ARW
• Olympus: ORF
• Panasonic: RW2
• Fuji: RAF
• Generic RAW like DNG
Not as “some unnamed file that sort of opens”, but as clean files Lightroom and Capture One handled like normal. I compared some recovered CR3 files with backups from another card, they matched visually and on histogram.
It also picked up things I do not use daily but have seen on client drives: Apple ProRes, RED R3D bits, random 3D files like Autodesk stuff. I do not rely on those, but it tells me they bothered to support more than JPEG and DOCX.
The wedding card disaster that sold me for good
This one is burned into my memory.
Friend of mine shoots weddings full time. Two 64 GB SD cards, whole day on them, dual slot body. She gets home, pops the first card into a cheap USB reader. Windows hangs halfway through a copy, she forces a reboot, and now the card shows as “RAW”. No folders. No files. “Do you want to format this drive”.
She called me around 11 at night, shaking.
I threw my laptop in a bag, drove over, grabbed the card, told her not to touch the second one. Installed Disk Drill, pointed it at the dead card, ran a full scan. Took maybe four or five minutes.
Result list: 800+ RAW photos, roughly 400 JPEGs. We clicked through previews inside the app. Every file showed clean. No weird black bands, no half images. Recovery took another few minutes.
Next morning she opened everything in Lightroom and delivered the gallery later without needing to reshoot or refund. She bought me wine and bought her own license the next day.
That is when I stopped “trying new tools for fun” and kept this one around.
Why the preview matters more than the scan itself
Once you scan a messed up drive, you often see thousands of files. Not all of those are alive.
Without a preview system you do this:
- Select a giant batch.
- Recover, wait.
- Open them in your editor.
- Find out half are corrupt.
- Go back, tweak settings, try another pile.
Disk Drill shows previews for photos, many videos, documents, right in the result list. Click a file, it opens inside the app. There is also a simple “recovery chance” label next to each file: high, average, low.
So before writing a single byte to your recovery destination, you know whether you are pulling solid files or lottery tickets. If I see a folder of client RAWs with “high” and working previews, I do those first. If another folder is all “low” with broken previews, I still might try them, but I treat it as bonus, not as something to promise anyone.
Recovering video from cameras that like to shred files across the card
This part surprised me the most because video recovery usually sucks.
If you ever tried saving footage from a corrupted action cam or drone card, you probably know the classic failure: recovery program finds “MP4” files, you restore them, then either they do not open or they play a couple seconds and freeze.
Cameras write large clips in pieces scattered on the card. When the file system vanishes, simple signature based recovery grabs chunks in the wrong order or without all the needed parts.
Disk Drill has something they call Advanced Camera Recovery. Marketing names aside, here is what I saw.
I had a DJI drone card that went corrupt during a battery swap. Card went from fine to unreadable in one flight. About six hours of footage, mix of 4K and 1080p.
I ran ACR on it. It recognized it as DJI media and rebuilt the clips. Every video file it reported as “high” came out playable. No three second freezes. Audio in sync. Timeline scrubbed cleanly in Premiere.
I tried other tools on the same card earlier. The best result I got elsewhere was maybe 2 good clips out of 10–12. Here it was basically all of them.
They say it knows GoPro, DJI, Canon, Sony, Nikon, Insta360, Panasonic patterns. I do not own all of those, but for DJI and Sony mirrorless, it did what I needed.
Failing HDD and how I stopped torturing it
Different story. I had this old 2 TB external spinning drive on my shelf. It started making occasional clicks. Not a constant death rattle, more like once every minute when under load.
My first instinct was to point a recovery scan at it and pull what I could. That is wrong. Every read operation stresses a failing drive more.
Disk Drill has a byte to byte backup feature. It clones a drive into an image file, sector by sector. The idea is: clone while the drive is alive enough, then stop touching it.
Useful parts:
• It shows a visual map of the drive surface with colors for healthy sectors, slow ones, and bad ones.
• First pass skips over bad or slow sectors so it can grab healthy zones quicker.
• Then it circles back to trouble areas, trying smaller reads to get partial data.
• You can pause and resume if the drive is overheating or your system needs a break.
I did this on that 2 TB drive and ended up with an image around 1.8 TB of readable data. Then I unplugged the drive, put it in a box, and did every recovery run on the image instead.
Disk Drill treats the image as if it is a physical drive. Scan it twenty times if needed. Try different settings. The original disk stays off and safe. Mine stopped being detected entirely a couple weeks later, so without that clone, all of it would be gone.
Quiet S.M.A.R.T. warnings that saved me twice
In the same app there is a S.M.A.R.T. monitoring panel. It reads the usual info from drives: temperature, reallocated sectors, pending sectors, power on hours, and a basic “health” estimate.
It is not a full monitoring suite, but it is enough to notice when numbers start heading in the wrong direction.
Twice I plugged in drives for something unrelated, opened Disk Drill, saw one of them flagged with worrying reallocated sector counts. Both times I copied data off to fresh storage that same day. Within months, both started showing file system hiccups.
If you work with spinning drives, having even a simple health readout near your recovery tool reduces nasty surprises.
“Recovery Vault” and why I turned it on quietly and left it
There is a feature called Recovery Vault. Most people probably skip it, but it helped once already.
You enable it on folders you care about, for example your main project folder and desktop. It does not keep full copies of every deleted file. It keeps extra metadata about deletions, such as original path and name, in a lightweight database.
When something gets deleted from a protected folder, Disk Drill has better info to work with later. That means:
• Higher odds of finding the file.
• Original names preserved.
• Original folder paths preserved.
On my machine it had no noticeable performance or storage cost. I set it up on my main work folders, then forgot about it until I accidentally deleted part of a project tree thinking it was an old copy. Recovery with Vault enabled was quick and the folder structure came back in the same layout.
Using it on both Windows and Mac without re-learning anything
My desk setup is Windows. My travel machine is a MacBook. I do not want two separate mental models for “how do I get my files back”.
Disk Drill gives access to both Windows and Mac versions under one license. UI and workflow are nearly the same. I barely have to think about which platform I am on.
Best part for me was session portability. You can save a scan session on Windows, then open it on Mac and continue. Or the other way around.
Example: I started scanning a 1 TB drive at my desk, realized I needed to leave, saved the session to the drive I was recovering onto, then loaded that session file on my MacBook and picked up where I stopped. No need to start from scratch.
Weird file systems that “just worked”
Most people hit NTFS, exFAT, maybe FAT32. Those are there. The interesting part is the less common stuff.
So far I have pointed it at:
• An old Mac disk in HFS+.
• Newer Mac volumes in APFS.
• Linux USB sticks in EXT4.
• Random friend’s backup disk formatted in BTRFS.
• A drive that showed up as “RAW” with no file system at all.
One specific case: coworker handed me a USB stick from a Linux box, formatted EXT4, plugged into my Windows machine. Windows did nothing with it. Disk Drill saw the EXT4 file system, scanned it, showed files with structure. I did not boot into Linux or mess with extra drivers. I scanned, copied, done.
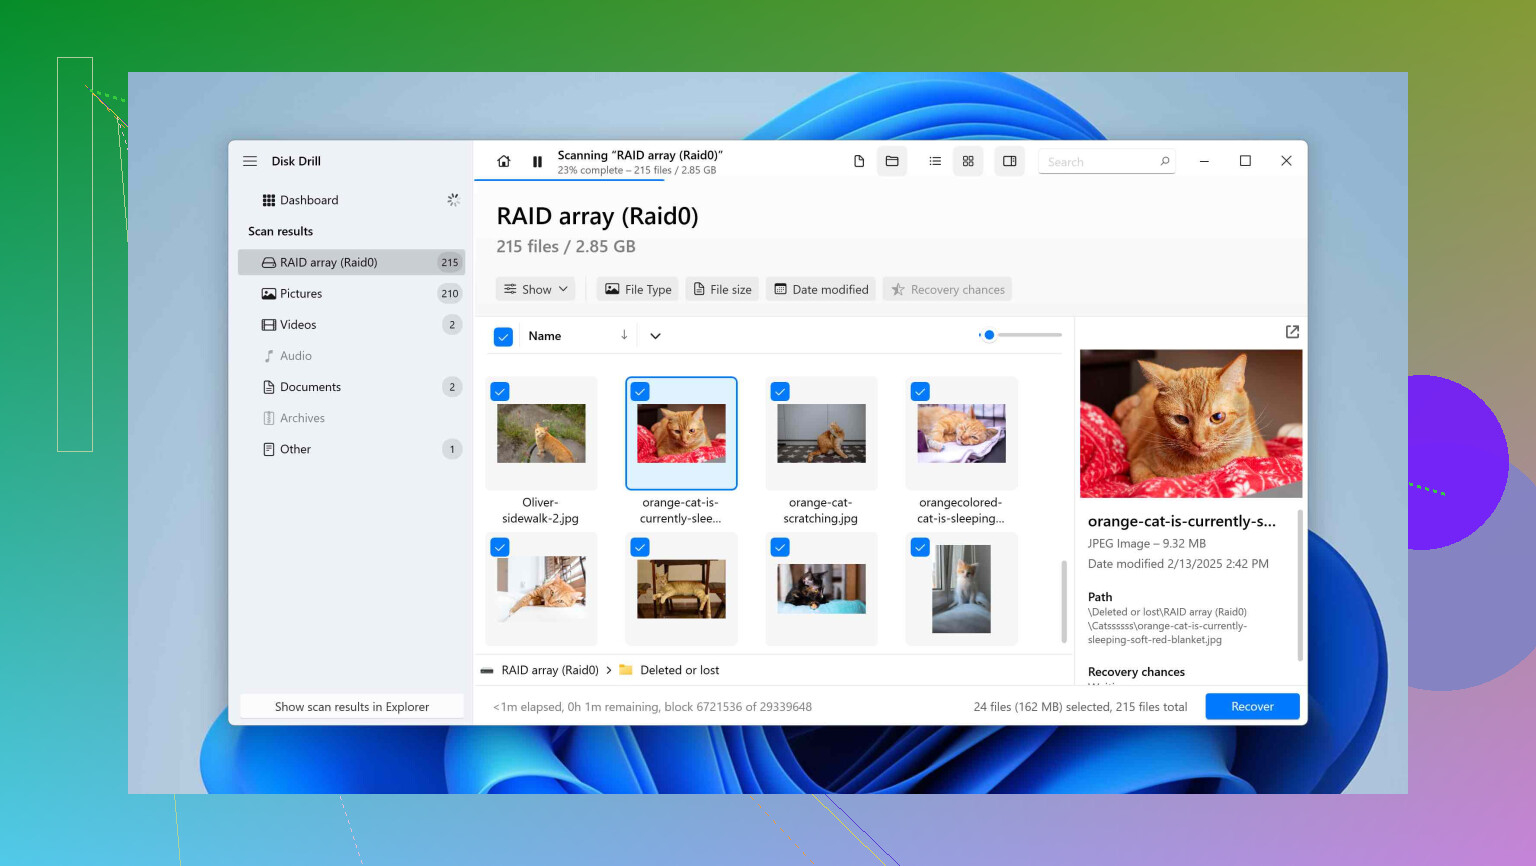
RAID users and Storage Spaces people
I do not run RAID at home. But some of you do, and a few people at my coworking space asked.
Disk Drill advertises auto reconstruction of software RAID:
• RAID 0, 1, 5, 6, 10, 1E
• JBOD
• Windows Storage Spaces
I watched someone there use it on a broken RAID 5 made from a few consumer HDDs. It detected the array layout and let them scan the logical volume. They got most of their stuff out without needing a separate specialty recovery app.
Where it worked for me and what I use it for now
Stuff I personally recovered with it so far:
• SD cards “formatted” by mistake in camera right before a second shoot.
• Corrupted SD cards from Sony and DJI gear.
• That slowly dying 2 TB external HDD that later stopped spinning up.
• USB flash drives yanked out during copy.
• A NAS that lost its mind after a firmware update and dropped a share.
Pattern is roughly the same:
- If the drive is failing mechanically, I run the byte to byte clone first.
- Otherwise, I scan straight on the device.
- I sort by file type or folder.
- I rely heavily on previews and the recovery chance info.
- I recover to a different disk and leave the broken one untouched afterward.
The main reason I keep recommending it to people is that it lets you test it on your actual problem. The free version will scan, show you what it finds, and let you preview. You see names, folder trees, and open files inside the app.
So if you are torn between a bunch of tools, point Disk Drill at the damaged drive, let it run, and look at the previews. If it shows the files you care about, you know. If it does not, you go try something else without guessing.
That has been my experience after a few years of using it across real failures, not just test folders I deleted for fun.
23 Likes
Go with Disk Drill first.
Quick compare for your exact case, deleted folder on Windows internal drive, need safe and fast:
- Risk and safety
- Stop writing to that drive now. No installs, no downloads to it, no browsing.
- If possible, install the recovery tool on a different drive or USB stick.
- Disk Drill has the byte to byte image feature that @mikeappsreviewer talked about. Here I slightly disagree with him on timing, I suggest you image the drive before long scans if the data is mission critical. You work on the image, not the live disk. That lowers the chance you overwrite the deleted files during multiple attempts.
- Recuva vs Disk Drill for what you want
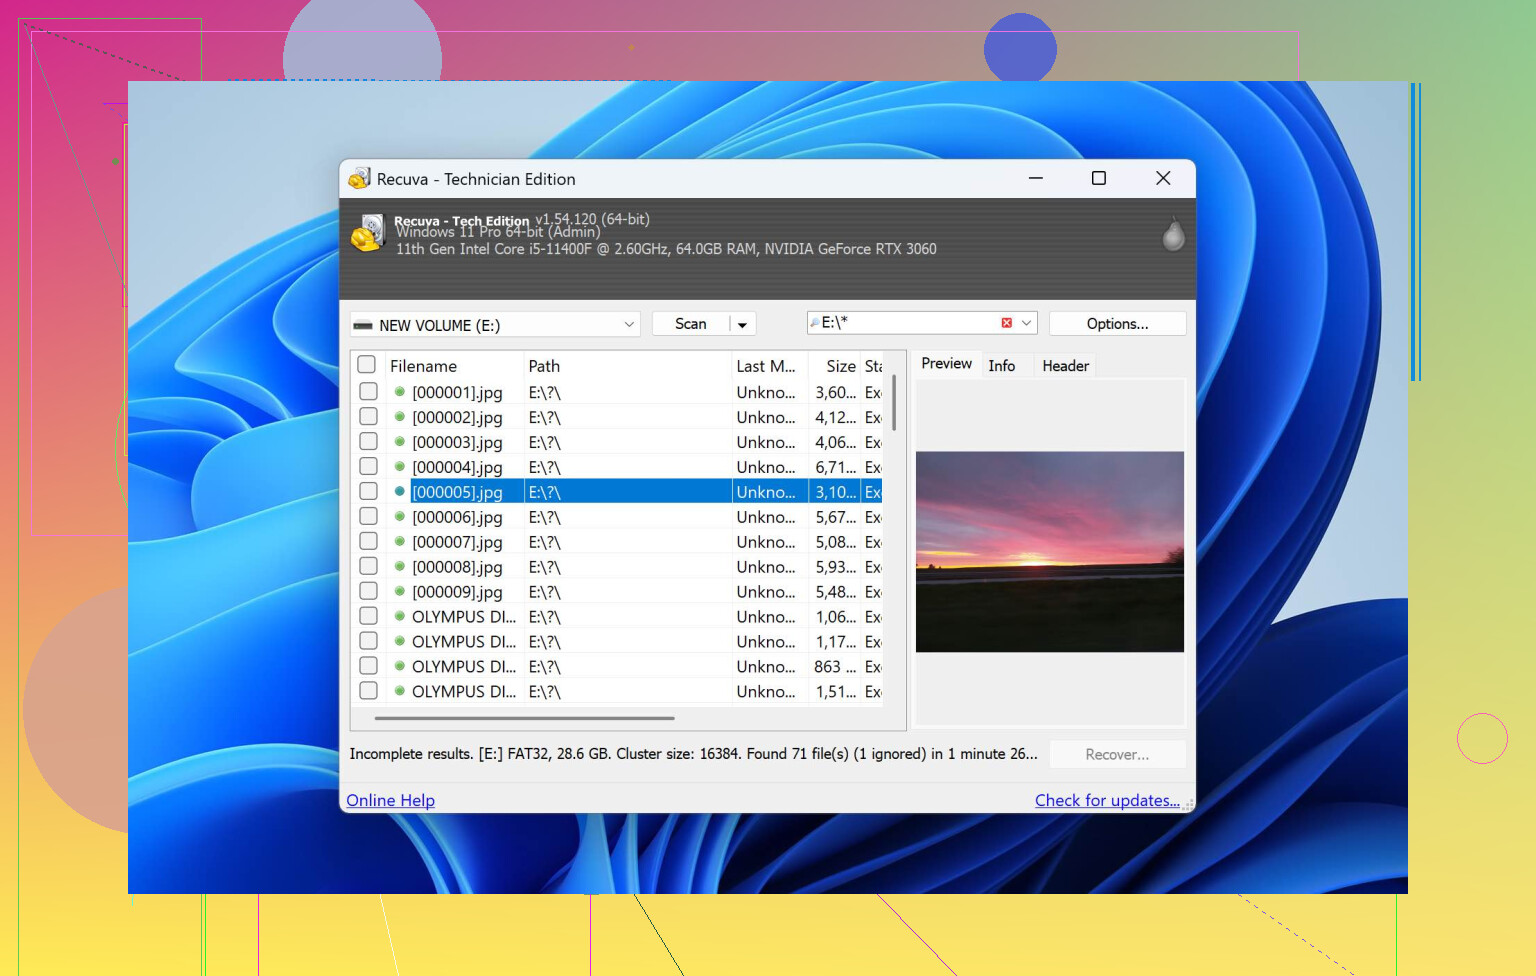
Recuva
- Free, lightweight.
- Works ok for simple, recent deletions on non damaged drives.
- Interface is older. Less guidance.
- Weak on RAW, video, weird file systems.
- No drive imaging built in.
Disk Drill
- Better for mixed work and personal stuff. Photos, docs, archives, email files.
- Full scan stack in one click. No guessing quick vs deep scan.
- Strong previews, so you see if your Word or Excel file opens before recovering.
- Imaging, S.M.A.R.T., and session saves help if this turns into more than a quick mistake.
For “I deleted a folder a few minutes or hours ago on a healthy SSD or HDD”, both can find data. I still suggest Disk Drill first, because:
- You scan once and see what is there.
- You preview files and check if the critical ones look intact.
- You decide if it is worth paying, instead of bouncing between tools.
- Practical steps I would do in your place
- Stop using the affected drive.
- On a different drive or USB, download and install Disk Drill.
- If your deleted folder was on a failing or noisy HDD, run a byte to byte image first and work on that.
- Run the default scan on the problem drive or image.
- Filter by file type and path, use previews to confirm.
- Recover to a different physical drive, never to the same one.
If Disk Drill does not show the folder or files you need with good previews, then try Recuva as a second opinion. Starting with Recuva then Disk Drill increases writes and eats time, which is why I would flip the order compared to what many older guides suggest.
Also, since you are dealing with data loss now, it is worth understanding what data recovery is and what to expect from it. This guide on how data recovery works and what you should expect from the process explains in simple terms how deleted files are stored, when software recovery helps, and when you need a lab.
I agree with most of what @mikeappsreviewer said about Disk Drill in real use. Where I differ a bit is that I think people sometimes over scan the original disk. My rule of thumb, one solid imaging pass if there is any hint of risk, then all experiments on the clone. That keeps the odds in your favor if this folder holds work and personal stuff you cannot replace.
Disk Drill first.
Recuva is fine for “I deleted one JPG from my USB stick in 2014” type stuff, but you’re juggling work + personal files and time pressure, so you want fewer knobs and more signal.
Couple of points that aren’t just repeating what @mikeappsreviewer and @codecrafter already laid out:
-
Folder structure & filenames
Where Recuva has usually annoyed me is when I’m trying to get an actual folder back instead of a few random files. You end up with a long flat list and half the names mangled.
Disk Drill tends to reconstruct folders and paths more cleanly, especially on NTFS. When you’re trying to restore a project tree that actually builds / opens, that matters more than people think. -
Mixed file types in one hit
You said “important work and personal files.” That usually means a mess of DOCX, XLSX, PDFs, ZIPs, maybe some PST/Outlook data, plus photos. Recuva is ok with basic docs, but as soon as you hit archives, mail stores, RAW photos etc., it becomes a coin flip.
Disk Drill’s all-in-one scan is better when you don’t even remember exactly what was in that folder but you know it hurt when it vanished. -
Free vs “actually costs money” problem
This is where I slightly disagree with the “always try free first” mindset. Free is tempting, but every extra install, scan, and “let’s try again with different settings” is more writes on the same disk. You want one serious pass, not five experiments.
What I like about Disk Drill specifically: the free version still lets you run a full scan and preview results. You see real filenames, tree, and open a bunch of them inside the app. So you can decide if it’s worth paying before committing, instead of doing multiple tools blind. -
SSDs & modern Windows
People forget that with NTFS on SSDs and Windows doing background stuff, your deleted cluster space gets reused faster than on old spinning disks. Recuva’s “quick scan” sometimes looks great on older HDDs but on SSDs I’ve seen it miss things Disk Drill dug out with the deeper run.
If your deleted folder was on an SSD system drive, I’d definitely lean Disk Drill. Time from deletion to first scan is more important than which of these two you pick, though. -
When Recuva actually makes sense
I’d only put Recuva first in these cases:- Completely non critical stuff, you just want to see if you can get it back for free.
- Tiny deletion on a secondary HDD, no SSD, no system drive, and you don’t care if you waste some time.
For what you described, that doesn’t sound like your situation.
Minimal step plan, without repeating every instruction already in this thread:
- Stop using the drive where the folder was deleted. No downloads, no installs, no saves.
- On another drive or USB stick, install Disk Drill for Windows.
- Run its standard scan on the affected volume, no fancy tuning.
- Use the folder tree and previews to verify the exact folder and files you care about.
- Recover to a different physical drive.
If Disk Drill’s scan does not show what you need with good previews, that’s when I’d try Recuva as a “why not” second opinion. Starting with Recuva then moving to Disk Drill, like a lot of old blog posts suggest, is backward in 2026.
Since you mentioned you were looking at Recuva, you might also want a broader view of what else is out there besides just these two. There’s a useful comparison of other tools in this space here: exploring powerful Recuva alternatives for safer file recovery. That’s more for later, once you’ve dealt with this current “oh no” moment.
Short version: for an “I really need this folder back” situation on Windows, I’d start with Disk Drill, use the previews to judge your chances, and only touch Recuva if Disk Drill strikes out.
Skip the panic installs and random trial runs. For what you described, I’d still put Disk Drill before Recuva, but with a few nuances that haven’t been stressed yet by @codecrafter, @sterrenkijker and @mikeappsreviewer.
Where Disk Drill actually pulls ahead
Pros:
- Handles mixed workloads better. One deleted folder with Office docs, PDFs, ZIPs, photos and maybe some video is exactly the kind of scenario Disk Drill is built for. You get a structured view, not just a flat pile of “found.xxx”.
- Folder reconstruction is stronger. For real-world project trees, it often restores the original paths and names, which is a pain point with Recuva when you need an entire working directory back, not a single file.
- Unified scan. You are not asked to choose between quick, deep, signature, etc. It just runs through everything on NTFS and starts showing results as they appear.
- Previews and recovery chance. Being able to click through Word docs, photos and even some videos before actually recovering means you do not waste time restoring junk.
- Imaging & “scan the clone”. If your deleted folder was on a drive that has started acting weird, Disk Drill can create a byte‑to‑byte backup and then work on that image, which greatly reduces risk.
Cons:
- It is not truly free for large recoveries. You can scan and preview at no cost, but to pull a substantial batch of files you will hit the paywall. If your folder is small and non critical, that may feel overkill.
- Heavier install and UI. Recuva is lightweight and portable. Disk Drill brings more features than you strictly need if this is a rare one‑off incident.
- Can tempt you into “one more scan” because it finds so much. Multiple long runs on a stressed SSD are not ideal, so you still need some discipline.
Where I slightly disagree with the others
Some folks say “go straight to Disk Drill and do everything from there.” I would tweak that:
- If the deleted folder was on a mechanically suspect HDD (clicks, slow access), I would not start with Disk Drill’s full recovery scan. I would use its backup / imaging function first, or in truly bad cases go straight to a professional lab. Hitting a dying drive with deep scans, even from a good tool, is often what finishes it off.
- If this is a simple, recent delete on a secondary HDD and the files are not life or death, Recuva can still be worth a five‑minute try as long as you:
- Run it in portable form from another drive.
- Do a single pass.
- Stop the moment it does not show the folder you want.
For your “important work and personal” combo, I would only do this if paying for software is absolutely off the table.
How I would prioritize in your exact situation
-
System drive or SSD, important folder, no obvious hardware issues
- Install Disk Drill on a different drive.
- Run its standard scan on the affected volume.
- Use its folder tree to locate the missing directory and check previews.
- Recover only to another physical drive.
-
External HDD that behaves normally, still important but not “company‑ending”
- You can still go Disk Drill first to minimize time and maximize structure.
- If you really want a free pass, Recuva can be a quick first look, but do not bounce between settings and repeated scans.
-
Any signs of hardware trouble
- Skip Recuva entirely.
- Use Disk Drill specifically for imaging or stop and consider pro recovery.
@codecrafter focused well on keeping writes down. @sterrenkijker highlighted the risk of playing with multiple tools. @mikeappsreviewer went deep into real‑world camera and mixed‑media use, which lines up with Disk Drill’s strengths. The angle I would add is that your situation sounds like a classic “mixed, important, time‑sensitive” folder loss, and that is exactly where Disk Drill’s structured recovery and previews are worth starting with, despite the license cost.
So: Disk Drill first, single careful pass, recover to another drive, then stop touching the source volume once the important files are back.